

Arduinoではスケッチに直接コードを書いても動作しますが、処理が増えてくるとごちゃごちゃして見にくくなります。
そんなときに便利なのが「ライブラリ化」です。
ライブラリにまとめておけば、スケッチから簡単に呼び出すことができ、再利用もしやすくなります。この記事では、I2C接続の液晶「AQM1602」を例に、最小限の自作ライブラリを作る方法を解説します。
ライブラリ化のメリット
- スケッチをスッキリ書ける
- 同じ機能を別のプロジェクトでも使い回せる
- 公開すれば他の人も利用できる
つまり「部品を組み合わせるようにArduinoを使える」のがメリットです。
ライブラリのフォルダ構成
自作ライブラリは次の場所に置きます。
- Windows:
ドキュメント/Arduino/libraries/ - macOS:
書類/Arduino/libraries/ - Linux:
~/Arduino/libraries/
ここに MYAQM1602 フォルダを作り、その中に以下を保存します。
Arduino/libraries/MYAQM1602/
 ├─ AQM1602.h
 ├─ AQM1602.cpp
└─ library.properties ← 後で追加してもよい- ヘッダーファイル (
.h): クラスや関数の宣言 - 実装ファイル (
.cpp): 関数の中身 - library.properties: ライブラリ情報(任意、後で追加可能)
これだけで最低限のライブラリとして機能します。
スケッチからの呼び出し方法
ライブラリを同じフォルダに置く場合
#include "AQM1602.h"- ダブルクォーテーション
" "で囲む - スケッチと同じフォルダ内を優先して探す
2. Arduino IDE の libraries フォルダに置いた場合
#include <AQM1602.h>- 山括弧
< >で囲む - Arduino IDE のライブラリ検索パスから探す
- 複数プロジェクトで使いやすくなる
ポイント
#includeで指定するのは ヘッダーファイル名- フォルダ名(ここでは
MYAQM1602)は一致させる必要なし - 「同じフォルダ用」と「ライブラリフォルダ用」の書き方の違いを理解することが重要
具体的な作成手順
aruduino IDE で作成する。
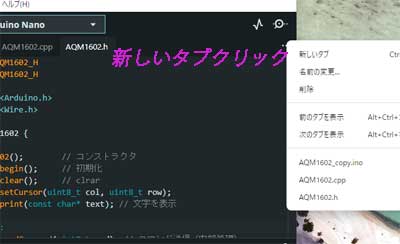
右上の…の部分をクリックしてプルダウンメニューを表示します。
次に新しいタブをクリックします。
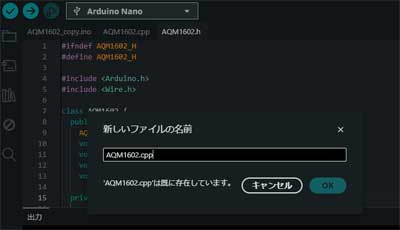
新しいファイルのメニューが出ますAQM1602.cpp AQM1602.h名前を入力して二つのファイルを作成します。
aruduino IDE に.info .cpp .hの3つファイルが出来たので、実際に動かしてみます。
AQM1602.h(ヘッダーファイル)
#ifndef AQM1602_H
#define AQM1602_H

#include <Arduino.h>
#include <Wire.h>

class AQM1602 {
  public:
    AQM1602();        // コンストラクタ
    void begin();     // 初期化
    void clear();     // clrar
    void setCursor(uint8_t col, uint8_t row);
    void print(const char* text); // 文字を表示

  private:
    void sendCommand(uint8_t cmd); // コマンド送信(内部処理)
    void sendData(uint8_t data);   // データ送信(内部処理)
};

#endif
AQM1602.cpp(実装ファイル)
#include "AQM1602.h"

#define AQM1602_ADDR 0x3E

AQM1602::AQM1602() {
  // コンストラクタ(今回は特に何もしない)
}

void AQM1602::begin() {
  Wire.begin();
  delay(100);
  sendCommand(0x38);
  delay(20);
  sendCommand(0x39);
  delay(20);
  sendCommand(0x14);
   delay(20);
  sendCommand(0x74);
   delay(20);
  sendCommand(0x52);
   delay(20);
  sendCommand(0x6C);
  delay(20);
  sendCommand(0x38);
   delay(20);
  sendCommand(0x0C);
   delay(20);
  sendCommand(0x01);
  delay(2);
}
void AQM1602::clear(){
  sendCommand(0x01);
  delay(4);
}
void AQM1602::print(const char* text) {
  Wire.beginTransmission(AQM1602_ADDR);
  Wire.write(0x40); // データモード
  while (*text) {
    Wire.write(*text++);
  }
  Wire.endTransmission();
}
void AQM1602::setCursor(uint8_t col, uint8_t row) {
  if (row == 0) {
    sendCommand((col + 0x40) + 0x40);
  }
  if (row == 1) {
    sendCommand((col + 0x40) + 0x80);
  }
}
void AQM1602::sendCommand(uint8_t cmd) {
  Wire.beginTransmission(AQM1602_ADDR);
  Wire.write(0x00); // コマンドモード
  Wire.write(cmd);
  Wire.endTransmission();
}

void AQM1602::sendData(uint8_t data) {
  Wire.beginTransmission(AQM1602_ADDR);
  Wire.write(0x40); // データモード
  Wire.write(data);
  Wire.endTransmission();
}
begin() 内の初期化シーケンスを配列にまとめてループで回すと、可読性も保守性も向上します。例えばこう書けます。
void AQM1602::begin() {
    Wire.begin();
    delay(100);

    // 初期化コマンドを配列にまとめる
    uint8_t initCommands[] = {0x38, 0x39, 0x14, 0x74, 0x52, 0x6C, 0x38, 0x0C, 0x01};
    uint16_t delays[]     = {20, 20, 20, 20, 20, 20, 20, 20, 2};

    for (uint8_t i = 0; i < sizeof(initCommands); i++) {
        sendCommand(initCommands[i]);
        delay(delays[i]);
    }
}
ポイント
- 配列
initCommands[]に順番通りのコマンドをまとめる - 配列
delays[]にそれぞれのコマンド後の待機時間をまとめる forループで順番に送信 → コードがスッキリ、追加・修正も簡単
💡 もしすべての待機時間が同じなら、delays[] を省略して delay(20); に統一してもOKです。
スケッチ例(動作確認)
test.info ファイル
#include <Wire.h>
#include "AQM1602.h" //同じフォルダ内

AQM1602 lcd;  // ライブラリのクラスを使う

void setup() {
  lcd.begin();              // 初期化
  lcd.print("Hello");
  delay(2000);
 // lcd.clear();
  char* text="abcdef";
  lcd.setCursor(4, 1);
  lcd.print(text);
    // 表示
}

void loop() {
}
たったこれだけで、AQM1602液晶に文字を表示できます。
最後に動作確認後、ヘッダーファイルとCPPファイルをライブラリーフォルダーに書き込みます、
ただしArduino IDEからで直接書き込むことができませんので、こちらのCPPファイルと.hファイルを別のエディターを使ってarduinoのlibraryフォルダの中に書き込んでください。あるいはZIPファイにして直接アップロードしてください。
これで、別のプログラムxxxx.info 中に include <AQM1602.h>宣言すると利用できます。
private / public の違い
- public: ユーザー(スケッチ側)から使える部分
- 例:
lcd.begin(),lcd.print(), lcd.clear(), lcd.setCursor()
- 例:
- private: ライブラリ内部だけで使う部分
- 例: send
command(),sendeData()
- 例: send
これによって「ライブラリの中身を隠しつつ、外から使いやすい関数だけ公開する」ことができます。
まとめ
- ライブラリは
.hと.cppを用意してlibrariesフォルダに置けばすぐ使える #include <ライブラリ名.h>で呼び出し可能- public / private を使い分けることで「ユーザーに見せる部分」と「内部処理」を分けられる
- 最小構成で作れば理解しやすく、後から機能追加もしやすい

